TEACHING MAWATTE! (To young Children)

Children learn complex footwork manoeuvres quicker if they have things to 'visualise' to help them place their feet in the correct place. Especially with younger children they will remember colours easier than , for example, letters (A, B, C) or commands like ‘To your Left!’. Hence the use of coloured tape in this simple but well worth the effort training Drill for Mawatte. With a little thought the Taped lines can also be used to assist with a myriad of footwork exercises - Good Luck. Any questions please ask
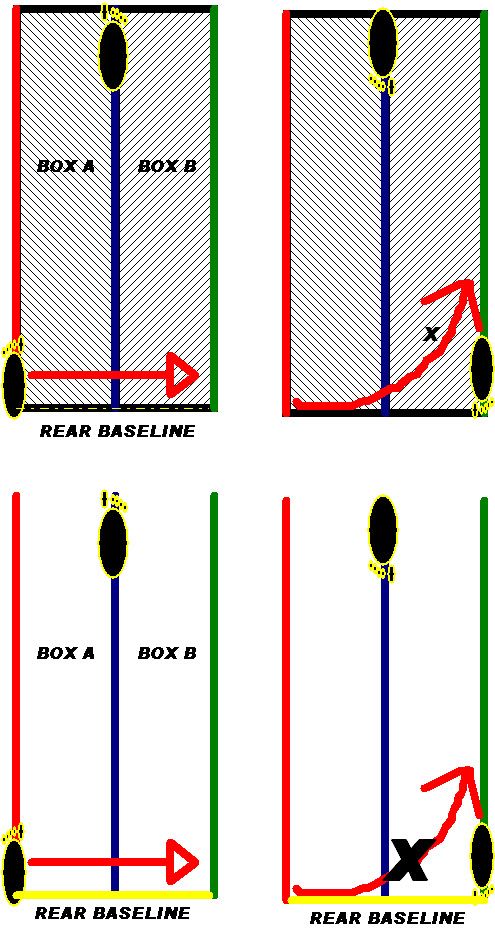
By using coloured tape you can mark out a Diagrammatical Map that will assist them to understand exactly where their feet should be at the start of a manoeuvre, and how their feet should then move to complete the manoeuvre - in this case Mawatte.
If we examine the Diagrammatical Map above we can see that BOX A represents the base area covered by basic Right Foot Forward Zenkutsu Dachi. The Karateka’s Right Foot is forward and placed in the top right hand corner of the base area Box A rectangle. Their Left Foot is placed accordingly at the bottom left hand corner of base area Box A rectangle. Box A is equivalent in width to the Karateka’s Shoulder width.
Box B represents the same factors when Mawatte has been completed and the student has turned correctly into Left Foot Forward Zenkutsu Dachi.
Note that the left hand edge of Box A is coloured red (their left foot is placed on the Rear Baseline edge of this RED Line) the right hand edge of Box A is coloured Blue (Their Right Foot is placed at the top of this Blue line) - make the child aware of these coloured lines so they can later visualise them.
Running parallel with Box A is an identical Box B. the outer (Right Hand) edge of Box B is coloured Green and the Rear Baseline running across the bottom of both boxes is dotted in Yellow. This line is very important as the student must move their Left Foot exactly along this Rear Baseline until it reaches the bottom of the Green line as they turn around and construct Zenkutsu Dachi in the opposite direction.
Beware that initially many of them will make the turn BUT instead of exactly following the Rear Baseline, they will make an Arc (see curving Red Line marked X in Box B) and thus upon completing the turn they will have shortened their stance considerably. This is wrong and they must move exactly along the Rear Baseline to get their stance correct.
I realise that all of the above initially sounds very complicated but actually it isn’t. All you have to do is get the students to concentrate on the RED, BLUE AND GREEN LINES and the important REAR BASE LINE.
Place appropriately coloured Red, Blue and Green tape (Electrician’s Tape is good and easily removable) on the floor at an average shoulder width distance apart as per the diagram with a different coloured tape along the Rear Baseline (Short Yellow Dashes of Tape work well!).
Let the children take turns at making Mawatte with the tape on the floor to guide them. Make it a bit of a game and score each one 0 - 10 for their accuracy in ‘hitting their mark’ with precision stepping on the diagrammatical ‘Map’ on the floor.
Give each student several attempts to get it as perfect as they can with the other students watching. This will allow them all to absorb the idea to the point that eventually they won’t need the tape on the floor because they will visualise it instead.
Note: Initially they will be tempted to look down at the floor whilst trying to ‘hit their mark’. Get them to keep good upright posture and ‘feel’ for the tape and the exact points to place their feet.
Give lots of encouragement and make it fun. If a student struggles be encouraging and supportive. The secret is to get them visualising the ‘Map’. You will be pleasantly surprised how quickly they pick it up and thereafter all you need do is remind them of the ‘Map’, they will visualise it and should then move their feet correctly to make a smooth Mawatte!
Obviously you reverse the exercise to help them complete Mawatte from a Left Foot Forward Zenkutsu Dachi.
NOTE: Obviously, to help them understand correct Base Area of the stances it is better to complete the full ‘Map’ on the floor as shown. However, it can be achieved by using only the Red, Blue and Green Lines and the Rear Baseline - See 2nd diagram. If you cannot mark your Dojo with Tape temporarily - use a large piece of Cardboard with the ‘Map‘ Drawn on it. (but be careful it doesn’t slip around causing an injury!).
A much simpler exercise for Adult beginners is to place an Obi on the floor running exactly along the floor as the Rear Baseline Does in the ‘Map’ and have them track their rear foot along the Obi as they turn - Simples!


Hope this helps